I've already submitted this tutorial to a few other places, and i figure since I don't have a site I should submit it here for you guys as well.
oliv's basic platform sprtiting tutorialPart1 Use greys to sketch a concept of what the sprite will be. Darker greys for shadows, lighter for basic lines. Do NOT begin cleaning up the lines while they are grey. The idea here was a robotic dinosaur with a cockpit where the head was, but that changed.Part2
 Use black to create an outline, on top of the greys. make sure the black outline is as clean as possible. Try fluxuating the black outline across different parts of the greys, to help see which lines are more natural.Part3
 Basic clean up, get rid of greys, and if anything about the lines looks awkward change it now.Part4
 Pick your pallet. This is one of the most important steps. First, think about the mood your going for. Then think bout what colors are associated with that mood, and pick out colors that go with it. keep in mind you must think of the actual color that object is- any child will tell you waater is blue- it is not. Water is grey, water is green, water is purple, water is blue, water is black, whater is white (reflections). In the color chooser, experiment with the colors- don't pick a color out of the section that has the general thing you're going for- really look at the colors.
 Now, in small sprites you need contrast- lots of it. So make sure your colors are few and far between. When adjusting shades (look at color choosing for ref.), you start where your original color is (the black dot in the green), and then move your next color either to the left or right of where the original color is, and down, then lower the ptich on the right hand side (that grayscale bar) as well. Note that I only used 4 colors total for this sprite. Put all the colors on your image, side by side, to see how they look. Make sure there is enough contrast! ALWAYS minimalize your color usage. (This is only basic pallet-choosing, not at all in-depth)Part5
 Begin coloring your dinosaur by filling in with your mid- color, then add shadows and highlights. When coloring, don't color things the way you think they should be- color them the way you see them. Go on google images and looks for reference pictures, so you see how the light really falls on them and how they really look. One thing I sometimes do is draw a lightsource up in the corner, to help me visualize where the light is coming from. DO NOT color over ANY of your outlines- outlines are absolutely necessary for small sprites. Just color around them for now.Part6
 Time to begin coloring your outlines- slightly. use the two darker colors (I have for), and use the lighter of two darks to color over where the brightest parts of the image are. Also, in places where the outline have doubled up, use the lighter of the darks to highlight the part with more light.Part7
 Begin anti-aliasing (AA). Start with your mid color, and go around the edges of the outline that when zoomed out are roughest. You tuck single AA pixels in the corners of the outline. Do not overAA with this shade, only use it for the parts that are roughest. Next take the lightest shade and begin adding pixels next to the darker AA in a manner where the pixel does not sit on top of them, creating a lump, but along the outline and net to the original AA pixel. Then, go through the corners that were not AA'd before and add AA there- but ONLY in the areas that need it. If you over AA the image will look fuzzy and blurred. MAKE SURE that none of the AAing interferes with the shape of the sprite- only softens it.Final
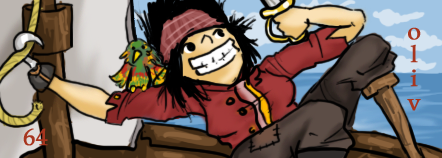
 Look at the sprite now- if anything is wrong, fix it. Sometimes you just have to finish a sprite before you really see what is wrong with it. Clean up the background, and you're finished. If you're going to animate the sprite, do so now, or if you're an outline-animator, too late :(. I hope this will help people with their sprites, even if all it does is teach good spriting form and techniques, not actual drawing skills- those come through practice.And here are the steps in one image (dammit I JPEG's the image >_< sorry guys)
 Now practice on these lines! Post with your colorings, make sure you do while following the steps in this tutorial!thnx guys :D
<3333333 :O
[[blk]col=olive]Text[[blk]/col]
TextAnd that's one damn nice tutorial.Here's my fox…
<img src="http://64digits.com/users/aeron/youcolor2.gif" />Yeah, not incredible, but that's because I'm retarded. But again, nice tutorial!>_> Anti-Alias made that chicken ugly.
I like the anti-alias. Makes it look like t has feathers. =D
Nobody officialy likes this tutorial.